Monday 26 November 2012

Studio Lighting - The lights :-)

TIM SMITH - FdA in Applied Photography (100257578)


5th November 2012


a selection of studio lighting

Further input / advice from 'Candice' re other studio equipment including:

  • Dedo Light
  • Arry light
  • Photon Beard
  • Kino Light
  • Light Pad
All above are different types of 'continuous lighting' (as opposed to 'flash')

We also discussed lighting techniques using 2 separate light sources - continuous and flash (using a 'light box')


DEDO light (no picture)
The Dedo lighting system was demonstrated. it was quite a small / lightweight system. A regular mistake / problem with this system was highlighted -  which was an on/off switch on the power unit (sometimes not seen)
The unit shown has a tungsten light source and the bulb is able to be moved forwards and back. There are shutter or 'barn doors' that can be folded forward to direct the beam of light emitted.

Hazard - heat / burn danger.

The lighting system comes with stands and several heads.

Reflection
This system is quite compact and not too heavy (needs a domestic plug / power source) and has several heads / stands in the kit (3 or 4)
This kit could be used on a small set (not massively powerful light source) in conjunction with flash lighting ??
I certainly se a place / time when I may use this system, together will others.


Arry light


ARRY light 
The above light was demonstrated  this is similar to the Dedo light and could be described as its 'big brother'. The Arry is larger, brighter and appears more robust than the Dedo. The light emitted is stronger - it is an 800w, tungsten system.
This lighting system comes in a it with 2 heads and mounts / tripods.
The system is often used on film sets.

Reflection.
Not sure that I would use this system but it is good good to be aware of its possibilities .......... perhaps it could be used to light backgrounds / backlighting ??

Danger - hot / burn hazard


Photon Beard


PHOTON BEARD light
The above lighting system is also a tungsten continuous lighting system. There are3 lights (heads) in each system. 2 x square and 1 x oblong shape. This is a 300w system. As can be seen in the above image, the light has 'barn doors' that can be used to direct or focus the light on the subject.

Danger - hot / burn hazard


Kino Flo


KINO (FLO) light
the above lighting system has a MUCH heavier stand and a much larger head. The head incorporates 'wrap around  barn doors that can be positioned very easily / simply. Both Daylight and Tungsten strip light are provided. A 'grid' is also supplied which can be used to direct the light onto the subject.
it was recommended that this light (or a series of) could be used to take an image of a picture or tapestry hanging on a wall. several would be used (from either side) to create a uniform / even light.


Light pad


LIGHT PAD system
The above system is the smallest and least bright as far as lighting is concerned. The light pads all come in the case shown - which contains 6 or 7 different shaped / size light pads. The light can be mounted on stands (supplied) or attached to other surfaces by clips (or even hand held). The lights do not get hot and are very strong / durable. a dimmer switch is also provided.

This system gives off very little light so would have to be used very close to the subject. .... possible small items like flowers or close up to the subject on face / head and shoulder images.


The advantages (and good practice) of weighting down the stands (with sand bags or similar) re all the above lighting systems was discussed - this will help prevent the stands / tripods falling over. The systems will be more secure and less likely to be knocked (or blown) over.


MIXING CONTINUOUS LIGHT WITH FLASH (Light box / Profoto)

Mr Bryson demonstrated how 2 differnt and separate light sources could work. Both continuous and flash lighting was used..

The continuous light source was a 'light box' (see below) and the flash light was a ceiling mounted Profoto (D1) flash light.
The camera was mounted on a studio (very solid) stand, positioned above the light box and facing (looking) down. The camera was in 'manual' setting of F8 and at 1/15th sec. (ISO 100)


Soft box and camera / camera stand


Readings were taken of both the light box and flash. Both were set for the same (similar) intensity.
Some small stones were placed on the light box and an image taken (no flash). The light can bee seen flowing through the stones but not much detail can be seen on the top of the stones. (see below)


Back lit only (continuous)
Another image was taken (see below) but this time a flash light (profoto) was used from above to capture more detail from the top of the stones.


Back lit & flash

Bibliography / References


STOPPEE,B., & STOPPEE, J., 2009, Stoppees' Guide to photography & light, what digital photographers, illustrators, and creative professionals must  know: Burligton, MA: Focal Press.


Saturday 24 November 2012

Studio Lighting - White background

TIM SMITH - FdA Applied Photography (100257578)

Sept - Dec 2012.

Introduction to next two modules by David BRYSON
  • Studio Practice
  • Professional Project.
Details given re visiting / assisting tutor - (Steph Rushton) and various study techniques / tutorials.


1st October 2012

Introduction to studio work.

Given talk by 'Candice' re heath and safety. Issues covered included burn hazards with hot lighting (high glide) systems and NO food or drink being brought into the studio area.

The advantages and hazards of the 'high glide' lighting system was also discussed. this talk included the emergency 'cut off' system. NB ... a pole is supplied, to raised and lower the lights. This will prevent any damage to the lights. Any adjustments to the 'spring / balance' within the lighting system is NOT to be done by students - ask a member of staff.

Procedure re booking out the studio (only 1/2 can be booked at a time without 'special permission') was also explained.

A 'guided tour' of the studio / lighting systems, including advice / tips, on the following:

  • D1 Profoto light & synch cables / remote controls.
also various 'heads' were demonstrated.
  • zoom reflector
  • grids
  • spot attachment
  • magnum
  • snoot
  • soft box
  • beauty dish (soft light)
  • ring flash
  • umbrellas(gold, silver & white)
  • battery packs
Tripods were explained / demonstrated including a large studio stand.

Light meters (Sekonic) were shown and explained, (and how to use ..) in conjunction with the Profoto lighting system.


********************************************************************************
THROUGH THE REST OF THIS MODULE (STUDIO) WE WILL BE LOOKING AT DIFFERENT STUDIO LIGHTING SYSTEMS ... BOTH CONTINUOUS & FLASH,
ALSO A VARIETY OF DIFFERENT 'HEAD' ATTACHMENTS,
AND DIFFERENT BACKGROUNDS (BLACK & WHITE... ETC)

LIGHT METER READINGS WILL BE USED, TAKEN WITH SEKONIC FLASH METERS AND THE STUDIO PROFOTO LIGHTS FIRED REMOTELY
********************************************************************************


8th October 2012

WHITE BACK GROUND - ONE LIGHT


See below contact sheet re images taken with a 'soft light' attachment (aka 'beauty light)


Studio lighting - using 1(Profoto) flash light and various 'heads' (on white back ground)

A tea cup and saucer were used as 'props' (see below .... using 1 x Profoto'D1' light)

Example of  prop / 'set up'


The cup and saucer were placed on a white sheet of paper that was attached to the back wall of the studio. The sheet curved down (smoothly) onto a table below - see below image.


A tripod was also used and the camera set to manual made. The ISO was set to 200 and film speed to 1/125th sec. The ISO and speed remained constant in all the below tea cup images.


Image showing Profoto (D1) light illuminated & 'soft light' (switched off)

In the above image please also note the 'tethering' system used by a fellow student - allowing the images to be instantly viewed on the laptop (edited and sent to the customer ... quickly ?)
The camera can also be controlled via the laptop.

SOFT LIGHT

Below image taken using a soft light from the right (see above image)


Notice how the shadow does not have hard (defined) edges and the reflection of the soft box (polo mint ??) on the inside of the cup.

Soft light attachment from R

The above image is very easy on the eye in my opinion :-)


Below is an image taken, using a gold umbrella. The umbrella is attached to the Profoto flash. The Profoto is used, facing away from the subject (cup) and the light bounces back onto the subject giving it a warm glow. other umbrellas were also used.... a white one and a silver one.


UMBRELLA ATTACHMENT (gold)

The umbrella really spreads the light around ............ this image was taken at F 20.
quite a lot of the light is 'lost' when reflected back on the subject.


Gold umbrella attachment


SOFT BOX


The soft box attachment is made up from its 'kit' form and fits onto the Profoto flash light. (see above)


Studio - soft box


The below image was taken using a soft box which was approximately 1 metre away from the subject and higher - to the right.
The below image was shot at F20 on power 6.5

Soft box

The below image was also taken using a soft box
This image was taken using F 13. Smaller F stop = more light.


With all of the above attachments, I experimented with both switching the light intensity up and down, and moving the light (flash) nearer and farther away from the subject.


********************************************************************************


15th October 2012

WHITE BACKGROUND - TWO LIGHTS (OR 1 LIGHT & 1 REFLECTOR)


This exercise involved taking pictures of a screwed up piece of paper on a white background.


********************************************************************************


*******************************************************************************


Bibliography / References


STOPPEE,B., & STOPPEE, J., 2009, Stoppees' Guide to photography & light, what digital photographers, illustrators, and creative professionals must  know: Burligton, MA: Focal Press.


Tuesday 20 November 2012

Studio Lighting - Black background

TIM SMITH - FdA in Applied Photography (100257578)

22nd October 2012

Black background - 1 studio light

For this exercise I brought into the studio a pespex / glass trophy that my wife won in a running competition. It is a cube with 2 runners etched or carved into it.


Just one light was used ....... I tried


  • soft box
  • reflector
  • soft light
  • soft light and grid


Bibliography / References


STOPPEE,B., & STOPPEE, J., 2009, Stoppees' Guide to photography & light, what digital photographers, illustrators, and creative professionals must  know: Burligton, MA: Focal Press.


Monday 19 November 2012

Professional project - Tim Smith

TIM SMITH - Professional project (100257578)

October - December 2012


Professional project - PART ONE


The first (professional) project completed was for the husband of a work colleague of mine ...... called  Mr Weston (aka, Graham)

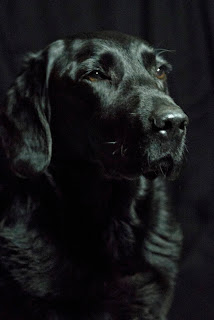
Graham has a 'working dog' (gun dog) called SAM. Sam is a black Labrador, and is almost 10 years of age.
Graham had seen a picture on the front cover of a shooting magazine (Shooting and Conservation - November / December 2011). The picture was of a black Labrador on a black background.

I have been tasked with trying re 'recreate' this image for him.

Sam .... by Tim


1st shoot - 5/10/12


Equipment

Nikon D800 camera, 70 -200mm lens. (no flash) - normal indoor domestic lights and Maglite torch. A1 size piece of black card.

The start - 1st meeting with client

This began with a long discussion with Graham about what he wanted .... how and where he would prefer the shoot to take place and over (for) how long. Also, when he would like the finished images / pics.

Graham handed to me an example of what he wanted in the final image  ....  which was a head and shoulder image of a black Labrador against a black back ground revealed on the front cover of  a ' Shooting and Conservation' magazine.

In my naivety I began this shoot, trying to leave the dog in its comfortable surroundings (its basket / bed) and in the corner of the kitchen where there was little or NO natural light ..... problems were immediately encountered, in that there was insufficient light. Even raising the ISO to almost the highest, still did not do the trick. Also it was very difficult to focus on the dog's face.... again, due to the lack of available light.


SO, NOT OFF TO A GOOD START

Reflection

This was an ill thought out session / attempt to capture an image.

  • perhaps I should have discussed what the client wanted (over the phone ?) prior to arriving at his house, or at the first meeting NOT taken any pics but simply discussed the clients                       wishes / instructions ??
  • No picture is ever going to be successful without LIGHT !!
  • I should have put the dog in the right place for the image to be taken .... not left it in the corner of a dark room !!
  • More thought should have gone into the back ground.(perhaps some black material ??)
  • Light source, light source .... light source !!
  • To recap ....... note to self. DO NOT RUSH INTO THINGS !

2nd shoot - 11/10/12


As a result of a disappointing 1st 'shoot', I went to the second meeting with the client 'armed' with more appropriate equipment. I took with me a large piece of black material to use as a back drop and a 'light pad kit' to illuminate the dog's face / head.

I discussed with Graham a better 'studio' type environment within his house that would allow me and the dog more space to work together.

I suggested we cleared (moved) the table and chairs from the (quite large) kitchen. I also used the existing  curtain rail between the kitchen and conservatory to hang my black material over.

I had already established a plentiful supply of plugs nearby for the light pad system.

I now had plenty of space to work and more distance between me and the subject to allow better focusing with the 70 - 200 lens (cannot focus at close range)

I positioned the dog about 4 - 5 feet from me and the dog was 4 - 5 feet from the back drop.

I used 1 small light pad that was positioned in front of the subject and to 'one-side' and above.

This 'set up' was NOT ideal but the client wanted the 'shoot' to be done at his house.

I completely accept that I was still TOO CLOSE to the subject ... but this was the only available space and definitely better than the first attempt / shoot.


3rd shoot - 18/10/12


After the second shoot I re-contacted the client an informed him I had some images that were much better than the first shoot. The images were e-mailed to the client (10 - 12 images)

SEE BELOW


In an attempt to improve the images obtained I negotiated with the client to go along to his house to have another shoot using the 'light pad' but this time using a larger (light pad) light source.

The same location (room) back drop etc was used - just more light on the subject.


Studio shoot - 12/11/12


Professional project - PART TWO

I received an invitation from Donington Racetrack, to go to one of their 'test days' to take pictures.
This happened on Thursday 15th November.

The meeting was planned and overseen by the Noise Control Officer (aka Fliss) and the Race Controller, Steve.

After the obligatory H & S briefing, I was let loose ............ but due to the fog, there was no immediate racing / testing going on.

No problem, this gave me the opportunity to visit all the garages and introduce myself to all the Racing Teams. This early introduction (by me) later proved crucial / vital re the pictures I was to take later.

Unfortunately my access wasn't to ALL AREAS (sadly) as I didn't have the necessary PUBLIC LIABILITY INSURANCE, but this is now on my list of things to do.

Once purchased I can have 'unrestricted access' to all (safe) areas .... i.e. I could wander around the track (behind the barriers)

Om this occasion I was confined to the 'pit area' but this did not cause a problem as there was much to do.


waiting for the mist to clear 


Studio Lighting - portraits

TIM SMITH - FdA in Applied Photography (100257578)


29th October 2012

This studio session was taken by Steph RUSHTON.
Steph is a photographer with over 20 years experience in the Fashion and Editorial Industries.

Steph began by discussing her background and photographic knowledge / skills, which was plentiful to say the least.

We then got started on creating the 'set up'.

We began by creating the backdrop / background using a role of black material (which was later found to be rolled up the wrong way - lesson ONE - check and clean background material prior to use !) which was suspended from a frame .... which was required to be quite high ... higher than I had expected, at about 10 - 11 feet. This was to ensure we did not have the top of the material 'in shot'.
As mentioned earlier... the material was not very clean and appeared scruffy.... so more care and attention next time.

We then moved on to the lighting type / style.

We used two soft boxes - one to either side at the rear. (see below image)

The subject (Kirsty) was positioned on a chair.

Kirsty ... ready for a modelling shoot


To prevent the two soft boxes from being 'in shot' we used two large polystyrene 'screens' .... these have been painted black and have the effect of blocking out the light. (see above and below image)

Richard takes a pic of Kirsty ... supervised by Steph


Photoshop image of studio 'set up'

To the front we used one light source and then altered the head attachment to suite (on a Profoto head) ... we used  an umbrella, a beauty dish (also known as soft light reflector) and beauty dish with grid.

The two soft boxes at the rear were set 1 stop higher than the front lighting system.


Kirsty


In the above image of Kirsty, her blonde hair is too white (or blown out at the edges) so less light from behind was required.

We tried having the model in both a seated and standing position.

In both the above and below image .... notice the dark shadow under the chin. later in the session / lesson, a reflector was used to remove / lesson the dark shadow.


Kirsty 
The below image of Bea was taken using the 2 soft boxes to the rear and the Profoto (with beaty dish) to the front - the  main / stronger light, being to the rear, but using a hand held reflector to the front .... notice the lack of a dark shadow under Bea's chin :-)

Bea


Kirsty - head and shoulders


Kirsty

Richard


Bibliography / References


STOPPEE,B., & STOPPEE, J., 2009, Stoppees' Guide to photography & light, what digital photographers, illustrators, and creative professionals must  know: Burligton, MA: Focal Press.